Posts Tagged ‘Flex’

Gonzo, an open source markdown editor

Gonzo

Gonzo is a lightweight, open source markdown editor written for Adobe Air for desktop using Flex 4 and AS3. Its a stripped-to-the-bone application that serves one purpose: helping you deliver well formed and easy to proofread web content.
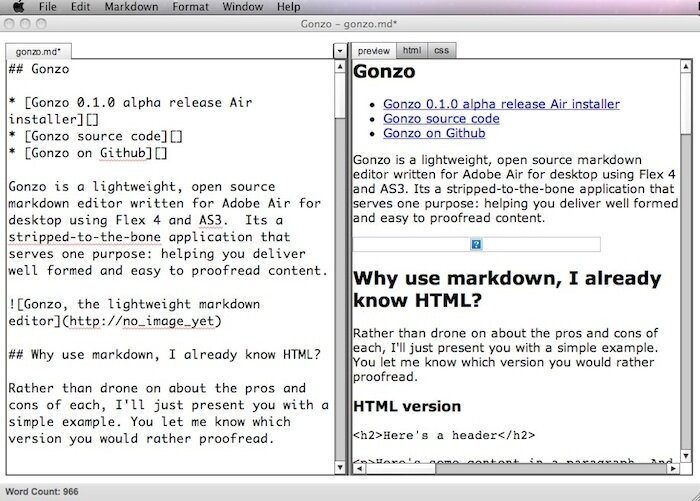
Gonzo, the lightweight markdown editor

Why use markdown, I already know HTML?

Rather than drone on about the pros and cons of each, I’ll just present you with a simple example. You let me know which version you would rather proofread.

HTML version

Here's a header

Here's some content in a paragraph. And here's a link to Google and another to my Github account.

And here's another paragraph

this time it contains a blockquote
  • One of these lists' syntax
  • has the following attributes:
    • intrusive
    • ugly
    • very hard to read
  • which one do you think it is?

Markdown version

## Here's a header

Here's some content in a paragraph. And here's a link to [Google][] and another to my [Github][] account.

And here's another paragraph
> this time it contains a blockquote

* One of these lists' syntax
* has the following attributes:
    * intrusive
    * ugly
    * very hard to read
* which one do you think it is? 

[Google]: http://www.google.com
[Github]: https://github.com/tonylukasavage

Why should you use Gonzo?

Well, unless you are writing content for the web, you probably shouldn’t. Gonzo is written specifically for those who want to leverage the readability of markdown over HTML when publishing web content. So whether you are writing a WordPress blog post, editing a wiki, or even just an answering a question on StackOverflow, Gonzo can make your life a whole lot easier.

In the spirit of markdown, I’ve added just enough features to increase efficiency while maintaining a content-driven writing experience. The idea is to only add features necessary for making web publishing easier. All the effort saved by not implementing useless features was redirected into usability.

Just Give Me The Feature List Already

Yeah, I tend to skip the text and go right for the feature list too. Kudos to anyone who actually read the previous content before coming here.

  • Live HTML preview – You can actually see the raw and rendered HTML generated by your markdown in a preview pane.
  • Multi-tab editing – Edit many documents at the same time.
  • Cross platform – Works on any desktop that supports Adobe Air.
  • Keyboard and (context) menu shortcuts – Creating markdown is even easier now with multiple was to create it.
  • HTML Export – Export your generated HTML to a file so it can easily be uploaded or shared.
  • Cheat Sheet – integrated markdown cheat sheet for beginners and vets alike.

Coming soon…

This is the list of features I personally would like to have, as I’m the only user so far. Please let me know what you think would be a good addition to Gonzo’s functionality.

  • yfrog integration – Wouldn’t it be nice to browse to a file on your desktop, upload it as an image, and get a markdown link placed in your document in one click? I think so too.
  • bit.ly integration – see above
  • Markdown toolbar shortcuts – Just in case the keyboard, context menu, and native menu shortcuts aren’t enough…
  • Preferences – Let users set things like fonts, colors, editor sizes, and eventually maybe even theming.
  • Local settings – For persisting preferences between Gonzo sessions

What else do you have in mind?

Want to Contribute?

Good! Like most open source projects, ongoing development will be heavily motivated by contributions and feedback from its community of developers and users. While Gonzo will continue to grow as I use and find features I want, its going to be you who determines if it matures into an application for the masses.

There’s a number of ways you can contribute:

  • Use it and let me know what you think.
    • What is it missing?
    • What am I doing wrong
    • What am I doing right?
  • Fork , start hacking away, and send me some pull requests. I’m very open to help, but bear in mind that its lightweight nature and usability should not be sacrificed for the sake of features.
  • Design help is very welcome. I’m a dev through and through, so it will remain spartan in frills unless someone else decides to add the polish.

Summary

There’s a lot to come yet for Gonzo. I still need to get the wiki up and running for basic docs. I may even take the time to make a web page for it if it garners enough interest. Or none of this could happen and I could just continue to use it myself. Only time and feedback will tell.

If you do start using or hacking Gonzo, you can let me know here, on , or on . I’d love to hear about your experience. In the meantime I’ll continue using it to write my web content and keep improving it as I see fit.

Oh, and this entire post was written in markdown using Gonzo. Here’s a link to the original markdown for the blog post.

Taking Notes on Node.js using Gonzo

Gonzo


In case you haven’t heard me talking about it on , I’m creating my own markdown editor called . If you don’t know what markdown is, read up on it at John Gruber’s (creator) blog. It was created as a way to make web based writing more readable from a writer’s perspective.

Here’s some of the highlights of the VERY young Gonzo:

  • Its open source and
  • Its written using Adobe Air for desktop, Flex 4, and AS3
  • The markdown to HTML parsing is done using
  • Uses Grant Skinner’s StringUtils.as
  • Its 3 days old as of the publishing date of the article
  • It generates HTML as you type markdown and shows it live in a preview panel
  • Counts your words for those web writers trying to hit quotas

Test Run


Last night I took Gonzo for its maiden voyage in “production.” I went to a meetup of the Pittsburgh Javascript Developers and discussed Node.js. I’ve never looked at Node.js before as server side Javascript always seemed like the avenue of a one trick pony. After shedding my preconceived notions, it became apparent that using one language throughout your entire technology stack could work miracles with your efficiency. But its young, alpha, and it changes a lot.

Rather than ramble on from a beginner’s stand point, I’ll leave you with the notes I took last night at the meetup using Gonzo. First, I’ll show you the notes as I entered into Gonzo. Like I said at the beginning, if markdown is unfamiliar, read up. Just one glance shows you how much more readable and editable it is than typical HTML markup.

My Notes in Markdown


## Node.js 
 
### Overview
 
* Server side JS. 
* HTTP/TCP built in
* non-blocking, event driven, 1 thread (launches process into event queue)
* not suitable for CPU intensive work
* Node.js is alpha and changes a lot between revisions
* for unix, not Windows friendly
* everything is a callback and gets its own process
        * lots of nested callbacks
* has to run from command line, no GUI for management.
* you can use it as a scripting language like ruby or perl
        * does not have to be event driven if ran this way.
* Having it server side allows you to use JS up and down your whole technology stack
 
### NPM
 
* Node package managaer
* A lot like CPAN for perl
 
### Modules
 
* [100's of modules](https://github.com/joyent/node/wiki/modules)
* examples
        * Sizzle
                * DOM selections and traversing
        * Paperboy
                * serves static files
        * Jade 
                * templating engine
        * ExpressJS
                * web framework
                * use it to deliver RESTful services
        * zombie headless browser
                * useful for testing Node driven services
                * assertions against returned data
                * DOM traversing is all custom code (why?!)
        * Coffeescript
        * multiple cores w/ web workers
        * Node Inspector
                * debugger
                        * breakpoints
                        * call stack
                        * watch expressions
                * command line
                * runs in a webkit browser
                * based on google's v8 engine
 
### Basic Server
 
        var http = require("http");
 
        http.createServer(function (request, response) {
                response.writeHead("Content-Type: "text/html");
                response.write("");
                response.end();         
        }).listen(8081);
 
### Emitters
 
Emitters are used to counter nesting of code. Should probably use constants to define emitter names. Add parameters afer emitter name in `emit()` to pass to callback.
 
        emitter.emit('eventName', param1, param2);
        emitter.on('eventName', function(param1, param2) {
                // do stuff
        });

And now, through the magic of Gonzo and Showdown.as, we get to see the markdown translated into HTML. You can then take the translated HTML and publish it to the web, allowing it to leverage any CSS and formatting your target venue has in place. Again, notice how much more readable the markdown version is than this HTML version.

My Notes Translated to HTML via Gonzo


<h2>Node.js</h2> 
 
<h3>Overview</h3> 
 
<ul> 
<li>Server side JS. </li> 
<li>HTTP/TCP built in</li> 
<li>non-blocking, event driven, 1 thread (launches process into event queue)</li> 
<li>not suitable for CPU intensive work</li> 
<li>Node.js is alpha and changes a lot between revisions</li> 
<li>for unix, not Windows friendly</li> 
<li>everything is a callback and gets its own process
<ul><li>lots of nested callbacks</li></ul></li> 
<li>has to run from command line, no GUI for management.</li> 
<li>you can use it as a scripting language like ruby or perl
<ul><li>does not have to be event driven if ran this way.</li></ul></li> 
<li>Having it server side allows you to use JS up and down your whole technology stack</li> 
</ul> 
 
<h3>NPM</h3> 
 
<ul> 
<li>Node package managaer</li> 
<li>A lot like CPAN for perl</li> 
</ul> 
 
<h3>Modules</h3> 
 
<ul> 
<li><a href="https://github.com/joyent/node/wiki/modules">100's of modules</a></li> 
<li>examples
<ul><li>Sizzle
<ul><li>DOM selections and traversing</li></ul></li> 
<li>Paperboy
<ul><li>serves static files</li></ul></li> 
<li>Jade 
<ul><li>templating engine</li></ul></li> 
<li>ExpressJS
<ul><li>web framework</li> 
<li>use it to deliver RESTful services</li></ul></li> 
<li>zombie headless browser
<ul><li>useful for testing Node driven services</li> 
<li>assertions against returned data</li> 
<li>DOM traversing is all custom code (why?!)</li></ul></li> 
<li>Coffeescript</li> 
<li>multiple cores w/ web workers</li> 
<li>Node Inspector
<ul><li>debugger
<ul><li>breakpoints</li> 
<li>call stack</li> 
<li>watch expressions</li></ul></li> 
<li>command line</li> 
<li>runs in a webkit browser</li> 
<li>based on google's v8 engine</li></ul></li></ul></li> 
</ul> 
 
<h3>Basic Server</h3> 
 
<pre><code>var http = require("http");
 
http.createServer(function (request, response) {
    response.writeHead("Content-Type: "text/html");
    response.write("<html></html>");
    response.end();     
}).listen(8081);
</code></pre> 
 
<h3>Emitters</h3> 
 
<p>Emitters are used to counter nesting of code. Should probably use constants to define emitter names. Add parameters after emitter name in <code>emit()</code> to pass to callback.</p> 
 
<pre><code>emitter.emit('eventName', param1, param2);
emitter.on('eventName', function(param1, param2) {
    // do stuff
});
</code>

And finally below is the above generated HTML copied directly into my blog. The CSS that governs my blog does its work on the elements and makes it look relatively web ready. Obviously if I put a little more effort in (as I will soon), I can tailor the CSS to play well with my generated HTML. For now, though, you can see the basic formatting applied. So without cluttering your writing with HTML you can still effortlessly generate web ready content.

Gonzo Generated HTML on my Blog


Node.js

Overview

  • Server side JS.
  • HTTP/TCP built in
  • non-blocking, event driven, 1 thread (launches process into event queue)
  • not suitable for CPU intensive work
  • Node.js is alpha and changes a lot between revisions
  • for unix, not Windows friendly
  • everything is a callback and gets its own process
    • lots of nested callbacks
  • has to run from command line, no GUI for management.
  • you can use it as a scripting language like ruby or perl
    • does not have to be event driven if ran this way.
  • Having it server side allows you to use JS up and down your whole technology stack

NPM

  • Node package managaer
  • A lot like CPAN for perl

Modules

  • examples
    • Sizzle

      • DOM selections and traversing
    • Paperboy
      • serves static files
    • Jade
      • templating engine
    • ExpressJS
      • web framework
      • use it to deliver RESTful services
    • zombie headless browser
      • useful for testing Node driven services
      • assertions against returned data
      • DOM traversing is all custom code (why?!)
    • Coffeescript
    • multiple cores w/ web workers
    • Node Inspector
      • debugger

        • breakpoints
        • call stack
        • watch expressions
      • command line
      • runs in a webkit browser
      • based on google's v8 engine

Basic Server

var http = require("http");

http.createServer(function (request, response) {
    response.writeHead("Content-Type: "text/html");
    response.write("");
    response.end();
}).listen(8081);

Emitters

Emitters are used to counter nesting of code. Should probably use constants to define emitter names. Add parameters after emitter name in emit() to pass to callback.

emitter.emit('eventName', param1, param2);
emitter.on('eventName', function(param1, param2) {
    // do stuff
});

Screenshot of Gonzo in Action


Gonzo in action

Summary and TODO


RIght now what is shown here is basically the extent of Gonzo's functionality. It's very young, but I plan to develop it aggressively. After this post, all of my blog content will likely first be written in markdown in Gonzo. I welcome contributors to the , but in all honesty, I'd wait a week or two before joining in. Its likely to change A LOT over that period of time.

I'll end with the current TODO list for Gonzo. Please feel free to add your own idea in the comments.

  • Add ability to edit and apply CSS within Gonzo
  • More robust "project" environment to allow grouping of markdown and CSS with generated HTML
  • Spell Checker, likely via Squiggly
  • Major UI polish (gonna need help here)
  • Create Mac and Windows native downloads on the

Repper for Blackberry Playbook with Full Source

The Code

  • – Full source code and Flash Builder “Burrito” project files

Repper for the Blackberry Playbook

The Overview

I mentioned this week that if you hustle you can still get yourself a free Blackberry Playbook.  Just follow my procrastinator’s guide and you could very well still have enough time to make it.  I also made posted a while ago the incredibly simple process of porting Repper, my fitness calculator mobile app written with Flex “Hero”, to the Playbook.  If that wasn’t enough for you, here’s one more bit of charity to motivate to try and beat that March 31st, 2011 deadline to submit an app for a free Playbook.

In the at the top I’ve included the full source and project files for Flash Builder “Burrito” for Repper.  Yep, everything it took to make a Playbook app that was submitted and approved is included within.  Take a look, pull it down, load it up, and see how a simple, functional app can get you a free tablet.  If you are wondering what your time is worth in comparison to the effort necessary, the model that developers are likely to receive (16 GB) is being priced at $500.  Seems a fair trade for a few hours of your time.

Repper on Github

Guide to a Free Playbook

Guide to a Free Playbook

So now you have a guide to getting a Blackberry Playbook app submitted as quickly as possible and full source code for a project that has already been approved. Pair that with the fact that I’ve not heard of one functional app not being approved, you are completely out of excuses to not cash in on this offer. Dig in and get it done.

Procrastinator’s Guide to a Free Blackberry Playbook

This past week my fitness calculator app, Repper, was approved for the Blackberry App World.  In return for enduring Research in Motion’s arduous app submission process, I will be awarded with a free Blackberry Playbook once they are officially released to the public.  Because I’m so pleased with this news, I thought I would share what I perceive as the easiest route to getting your hands on a free Playbook yourself.

You only have til March 31st to submit your app, according to the latest version of their offer.  While this date has been pushed back a number of times, I suspect this may be the hard deadline.  You don’t need to be approved by the due date, you just need to have your app submitted.  You may think I’m exaggerating here, but creating the app is the easy part, submitting is the real pain in the ass.

So before I get into too many boring details, let me lay out the list of things you need to do in order to reduce the amount of surprise time sucks you will encounter:

  • Sign up to be a Blackberry vendor
  • Get your code signing keys
  • Follow the getting started guide for setting up your AS3/Flex development environment (or WebWorks if that’s your thing)
  • Convert an existing AS3/Flex project or create a new app (IF YOU ONLY READ ONE SECTION, READ THIS)
  • Sign and submit your app to the Blackberry App World through the vendor portal.
  • Wait for approval

The steps necessary are listed in a very specific order to maximize efficiency, particularly becoming a vendor and getting code signing keys.  Read the section below detailing each step to find out why.  So again, DO THE STEPS IN ORDER, it will save you time in the end.

Sign up to be a Blackberry vendor

This is simple enough. You just need to fill out a form with relevant personal information do that Blackberry has a record of who you are.  In the early stages of this process you actually needed to submit a notarized letter, if you were an individual and not a company, in order to complete the registration.  From what I understand this is no longer required so it should make your life a little easier.

Blackberry is also waiving their usual $200 registration fee for developers during this period.  So whether or not you plan to hit this deadline, it may be worthwhile just to sign up and get in for free.

You will do this first because this process may take a few business days to complete.  They review the vendor registration submissions and Blackberry has not been terribly quick with approvals at any step in this process.  In fact, that is the most common complaint about the app submission process so far is simply how long it takes to complete.  So get this done first and don’t wait for approval to move on to the next step.

Get your code signing keys

This is another step that is as simple as filling out forms, but again requires Blackberry’s intervention to approve.  Also bear in mind that the code signing key you will receive will only work on one workstation once registered and cannot be transfered to another workstation.  You have to request another key is you want it to work on another workstation.  I have requested 2 keys thus far and both have taken at least 2 business days to arrive via email.

Like the last step, get this done now and don’t wait for the key to arrive to move on.  Hopefully by the time you are ready to submit your app to the App World you’ll have received your vendor approval and signing key.

Follow the Getting Started Guide

I’m not going to go into a great deal of detail here because the Blackberry documentation lays it out very well.  Just follow the guide found here and you’ll be fast on your way to your Blackberry Playbook “Hello, World!”.

One thing to keep in mind is that you must be building against the 0.9.4 SDK. I initially made the mistake of hanging on to the old 0.9.3 SDK and Blackberry has requested that I rebuild against the latest version before being able to make my app available on the App World.  Its not a huge deal, but will require you to go through the whole app update process if you don’t do it right the first time.  That said, they still extended me the offer of the free Playbook without yet having made this change.

Create your app

I know, I’m trivializing what sounds like a big step.  But here’s the thing: I’ve not heard of one Playbook app that has been turned down due to perceived usefulness or quality.  The only apps that I have heard being rejected are ones that actually don’t work.  This is common in the case of people trying to implement multitouch or gesture support when the simulator does not properly emulate the behavior.

In other words, put together a simple application that is useful to a niche group.  Or better yet, convert an existing AS3 or Flex Hero project to a Playbook app.  Check out my prior post to see how I did this in literally seconds.

For me, Repper was a no brainer.  It is a simple fitness calculator that determines your 1-15 rep max on exercises.  It was originally built using Flex Hero in Air for Android.  Its currently available on the Android Market if you wanna take a look at it there.  You can see there is no rocket science.  Blackberry has no high expectations for the functionality of an app for which developers have no device.  KISS is the key factor here.  Wait til you have one of these Playbooks in your hand before you try to get really creative with it.

Don’t get me wrong, I’m not encouraging fart app development here.  I’m just saying that at this point in the game Blackberry is happy handing out Playbooks to competent, motivated developers.  The quality of this one app is not what they are banking on.  They are hoping that with their generous gesture that they may woo more than a handful of mobile developers to spend their time on Blackberry Playbook apps rather than iPad or Android tablets.

In short, no excuses.  Create a useful, simple app.  Its not that hard and you know it.

Submit your app to the App World

Before digging into the specifics of the submission and signing process, here’s the things you’ll need:

  • Your signing certificate (CSJ file)
  • A less than 4000 character description of your app
  • A 480×480 product image for the App World
  • At least one screenshot that is no larger than 640×640
  • An 86×86 PNG icon, which includes a 5 pixel transparent buffer around it.  This effectively makes the icon content 76×76 or less.

First you are going to sign your release build of your application using your CSJ signing certificate.  This is an intimidating and somewhat complex process.  I highly suggest picking from the choices at the bottom of their code signing guide and following them to the letter.  I personally had no problems with the workflow for signing apps through Flash Builder 4.5 “Burrito”, but I’ve heard that some people had issues.  The safest route might be to follow the command line instructions for the entire process.  Again I emphasize, follow the instructions to the letter and don’t try to frankenstein multiple guides together, it makes it harder to troubleshoot the issues.

After you have successfully signed your app, you just need to submit it to the App World through the vendor portal. Just go to “Manage Products” and click the “Add Product…” button.  You will be walked through the steps necessary to submit your signed BAR app file.  So long as you have all the items I mentioned above in the list, and a successfully signed app, it should be pretty smooth sailing.  Finding these things out during the submission process was quite frustrating.

Carve out at least an hour for the above process, because it will take some time.  The code signing can be especially time consuming from the command line, but it seems to be the one sure fire way to get the app successfully signed.

If you followed my advice and became a vendor and requested your signing keys first, you won’t find yourself waiting for days once you’ve reached this part of the process… like I did.

Wait for approval

Now that you finally have your app submitted, you just have to sit back and relax… and relax…. and relax… and do your taxes… and ge your car inspected… and renew your driver’s license… you get the idea.  It takes a LONG time to get approved.  I’ve not heard of anyone getting their first app approved in under 2.5 weeks, with many waiting as long as 7.  But once again, as long as you get the app submitted before the deadline, you are still eligible for the free Playbook.

Once you finally do get approved you’ll receive an email telling you as much.  It may also include additional steps you must take in order for your app to be made available in the App World, like mine did.  Shortly following this, for me it was a day later, you’ll receive a congratulations notice for your free Playbook.  Included in this email should be a link to a purchase order for your Playbook with a cost of $0.00.  I have not heard of a single case where an app was approved but the developer did not receive a free Playbook offer.  Fill it out, send it in, and join us in the patient wait for the release date.

Hope you follow these steps and find yourself with your very own free Blackberry Playbook too!  Let me know if you happen upon success yourself.

From Air for Android to Blackberry Playbook in seconds

Overview

Repper for the Blackberry Playbook

NOTE: all source code is available for .

The above image shows my Air for Android app Repper ported over to the Blackberry Playbook.  The most remarkable thing about this port? It literally took about 60 seconds to complete!  Here is the shockingly simple, comprehensive list of steps I took to accomplish this:

  1. Create a new Flex mobile project in Flash Builder “Burrito” to target the Blackberry Playbook
  2. Copied the project files from my original Repper project to the new project
  3. Set up the Playbook simulator run settings in my new project
  4. Clicked “Run” and voila, Repper on the Playbook!

All components scaled properly.  All layouts fit to the available screen space appropriately.  All orientation transitions performed as expected.  How was this achieved without having to write a single line of device specific code?  It comes down to 3 simple things: Adobe Air, fluid layouts, and vector graphics skinning via Flex MXML.

Adobe Air

Blackberry’s use of the Adobe Air SDK for its Playbook development lets Flash/Air/Flex/AS3 developers leverage existing expertise and code to create apps.  The Air SDK for the Playbook also makes available QNX components to give Playbook apps a Blackberry look and feel.  You can choose from either.  This way Flex developers can use their existing paradigms and pure AS3 developers can make use of Blackberry’s QNX components.  You can even use both as Renaun Erickson details in this post.

For me the big win was taking Repper, a Flex “Hero” app for Android, and porting it directly, unchanged into a working Playbook app.  The Playbook Adobe Air SDK supports Flex “Hero” so everything just worked right out of the gate.  That’s the kind of portability that lets an independent developer be extremely productive.

Fluid Layout

Using fluid layouts with little to no defined pixel dimensions is key to writing a multi-screen app.  Take a look at this excerpt from the main .

        
id="landscapeGroup" includeIn="landscape" height="100%" width="100%"
paddingTop="{this.height*0.03}" paddingBottom="{this.height*0.03}" paddingLeft="{this.height*0.03}" paddingRight="{this.height*0.03}" gap="{this.height*0.03}" verticalAlign="middle"> id="landscapeInput" width="36%" skinClass="RepperInputSkin"> > paddingTop="{this.height*0.06}" paddingLeft="{this.height*0.06}" paddingRight="{this.height*0.06}" paddingBottom="{this.height*0.06}" gap="{landscapeInput.height*0.04}" horizontalAlign="right"/> >
width="100%" verticalAlign="middle" gap="0">
width="35%" text="{inputWeight}" keyUp="onWeightKeyUp(event)" restrict="0-9." contentBackgroundColor="0xffffff" color="0x000000"/> >
width="100%" verticalAlign="middle" gap="0">
width="35%" text="{inputReps}" keyUp="onRepsKeyUp(event)" restrict="0-9" contentBackgroundColor="0xffffff" color="0x000000" focusIn="textinput1_focusInHandler(event)"/> > > width="32%" height="100%" dataProvider="{repValues1}" itemRenderer="RepperEntry"/> width="32%" height="100%" dataProvider="{repValues2}" itemRenderer="RepperEntry"/> >

If you look at every component and container in this chunk of Flex MXML you’ll notice that no defined pixel dimensions are used. Every component’s size is determined using percentages or data bindings. I’m not going to lie, specifying dimensions in this manner will take more time and requires a bit of trial and error to get right. It helps if you do it with the expectation that another, dissimilar device will be using this same layout in the future. I did, and in this case the little bit of extra forethought paid off huge in terms of portability.

Because of design via fluid layouts, Repper appears properly in both portrait and landscape orientation on the Blackberry Playbook with no additional effort.

Vector Graphics via Flex MXML Skinning

The final factor that made Repper such a breeze to port to the Playbook was Flex Hero’s ability to create vector graphics via Flex MXML. By utilizing this capability you can create skins for your components that scale as the app scales. No external artwork of any kind is necessary. While this is not ideal for designers or highly stylized apps, a developer like me loves it.

Here’s another excerpt from Repper. This time it shows how I used fluid dimensions once again to create vector graphic skins for my components via the

     id="background" x="0" y="{this.height/6}" height="66%" width="100%" radiusX="10" radiusY="10">
        >
                 blurX="16" blurY="16"/>
        >
        >
                 weight="3"/>
        >
        >
                 rotation="-90">
                         color="#bbbbbb"/>
                         color="#ffffff"/>
                >
        >
    >
     x="0" y="{this.height/6}" height="66%" width="60%" radiusX="10" radiusY="10">
        >
                 blurX="8" blurY="8" angle="0"/>
        >
        >
                 weight="3"/>
        >
        >
                
                 rotation="-90">
                         color="#000000"/>
                         color="#444444"/>
                >
                
        >
    >

As you can see, percentages and binding are used to create skins for my components that are appropriately scaled regardless of the dimensions of the device. Not having to create skin resources for each device and orientation is a tremendous time saver. Especially for someone like myself who has no patience or talent for it.

Summary

Lesson for the day: with a little forethought and a penchant for Adobe Air, magic can happen. OK, maybe not magic, but you’ll have more time to explore the possibility of creating magic now that you won’t be wasting it on porting your mobile apps. Yes, I know, I’ve griped a bit lately about Flex Hero on , but there are undoubtedly some things it does very well.

In fact, if you think about it, anyone that openly supports Adobe and their efforts to create a viable cross-platform mobile development environment has done very well with it. I’m trying to think of who isn’t supporting it? Who’s at the “core” of the issue? I feel like day to day they are trying to keep the doctor away. Supporting Adobe should be as appealing as American pie. Oh well, hopefully some day they will have their thinking jolted like Isaac Newton did from a falling piece of fruit.

The Good, The Bad, and The Ugly of Flex “Hero”

Disclaimer

This article is from the perspective of someone whose AS3 and Flex experience is measured in months. This is meant to show those who aren’t long time Flash developers what they can expect with Flex “Hero”, Flash Builder “Burrito”, and Air for Android. But I didn’t go in alone, the Adobe community is full of smart and helpful people, just check my to see some of the names that helped. Particular thanks to , , and .

Overview

Recently I wrapped up my first Flex “Hero” Air for Android app, Repper. You can read my earlier blog post about it to download, get source code, or just learn more about it. I learned a lot about mobile development and deployment, but I want to talk specifically about Flex “Hero” and Flash Builder “Burrito”. Here’s this developer’s experience and perspective with using Adobe’s workflow for mobile development.

The Good

  • The Flash Builder “Burrito” workflow for building Android apps is fantastic. It was a breeze to setup a basic project and be testing it live on my Droid X. Some of the specific things I really liked were:
    • Pre-built templates for projects, components, skins, item renderers, and more speed up the development process
    • Built-in emulation for various Android devices
    • Testing on a device is very easy to set up
    • Managing Flex states through the Design View can be helpful in visualing layouts
    • Offers the familiarity and plugins of Eclipse
  • ViewNavigator and View make navigating through applications using multiple views simple. Using simple functions like pushView() and popView() you can move through your application and pass data with ease. Check out these posts for a more in depth look at this powerful and intuitive interface:

    ViewNavigator

  • PersistenceManager alleviates the hassle of trying to manage data between view states by using Local Shared Objects. Even when your mobile OS decides to close your app for memory or power shortages, the PersistenceManager will preserve your designated data. Check Jonathan Campos’s post on it for more details: Flex 4.5 PersistenceManager
  • Flex 4 skinning is pretty damn nice, especially for someone like me who is about 95% developer, 5% designer. Using MXML and AS3 you can create design and graphics for your components, keeping them separate from your UI’s layout and logic. This means you can effectively create vector skins using the AS3 drawing classes. No more importing images just to create gradients and rounded corners. Not as big a win for designers, but the pure developers out there will love this. Check out Ryan Frishberg’s article for more details: Introducing skinning in Flex 4. The screenshot showing Repper below highlights entirely programmatic design.
  • Repper with Flex 4 Skinning

  • Multiscreen development potential is very appealing and Adobe is working to grow it further. Christian Cantrell’s demo video below shows what Adobe Air is capable of in terms of “code once, deploy everywhere.” Android, iPhone, iPad, Blackberry Playbook, Desktop, and web are all valid targets for your single code base. While this is very exciting, it is also very young. Take this all with a grain of mobile salt as this topic shows up again in the “Ugly” section.
  • The Bad

    • Lack of native component support can be a deal breaker for some people building mobile apps. Its not for me nor for lots of people who are comfortable building their own components, but many want the native experience. But all hope is not lost with the following AS3 libraries available that emulate native components:

    • Nick Jonas

      Kevin Hoytandroid-components
    • Flex “Hero” is missing some core components that mobile developers will be expecting to be present. I for one was not expecting to have to build a modal select list from scratch. Unfortunately, though, Flex “Hero” does not contain the mobile equivalent of a combobox. You can create it with their scrollable List component paired with a semi-transparent background, but it would be nice to have this out of the box. Other notable absentees are sliders and tabbed layouts.
    • Not all native APIs are supported. While this should be expected in a cross platform framework, it can sometimes lead to unexpected roadblocks. In my case, I have only numeric input in my app. I wanted to default the soft keyboard to the numeric keyset. Unfortunately this is not possible in Air for Android. It takes some AS3 parlor tricks just to keep the soft keyboard closed when you don’t want it open on a TextInput focus. There’s even more to worry about with Apple development, but I’ll mention that in the “Ugly” section.
    • Simple things can be complicated. Take for example closing an app when a user leaves with the back button. Seems easy enough, but it takes 3 event handlers to do it properly and even this method is not without its problems. Check out the code I used below, thanks to Tom Krcha:
      protected function mobileapplication1_creationCompleteHandler(event:FlexEvent):void
      {
              if(Capabilities.cpuArchitecture=="ARM")
              {
                      NativeApplication.nativeApplication.addEventListener(Event.ACTIVATE, handleActivate, false, 0, true);
                      NativeApplication.nativeApplication.addEventListener(Event.DEACTIVATE, handleDeactivate, false, 0, true);
                      NativeApplication.nativeApplication.addEventListener(KeyboardEvent.KEY_DOWN, handleKeys, false, 0, true);
              }
      }
       
      private function handleActivate(event:Event):void
      {
              NativeApplication.nativeApplication.systemIdleMode = SystemIdleMode.KEEP_AWAKE;
      }
       
      private function handleDeactivate(event:Event):void
      {
              NativeApplication.nativeApplication.exit();
      }
       
      private function handleKeys(event:KeyboardEvent):void
      {
              if(event.keyCode == Keyboard.BACK)
                      NativeApplication.nativeApplication.exit();
      }
    • Debugging on a device can be tricky. So tricky in fact that I never got it working. In all fairness, I didn’t try to diagnose it any further after the getting the initial error because the app I was building was so simple. But the fact remains that it didn’t work out of the box for me. Maybe your experience will be different and I welcome anyone to call me an idiot and tell me what I did wrong.

    The Ugly

    • Universal mobile device support is minimal at this point. Android is covered pretty well up through the Air 2.5 SDK, but iPhone/iPad only support Air up to version 2.0.2 via the Adobe Packager for iPhone. This leaves out key APIs like camera support and video/sound capture, not to mention the bevy of bugs and gotchas that you have to watch out for. The workflow for deploying apps to iOS devices with the packager is also no picnic. While the Blackberry Playbook is proudly supporting the Adobe developer community, there’s been no official announcement, though there has been mention, of Flash or Air being on Blackberry smart phones.

      Long and short, you aren’t going to be hitting the widest part of the market when compared to other mobile frameworks like Appcelerator or PhoneGap. And even if you do, I’ve experienced first hand how users can be put off by having to install Adobe Air on their phone for the sake of an app. Until Air for mobile devices support becomes more common place, it may be viewed as an unnecessary evil by many mobile users.

    • Performance can be a problem for even the simplest apps. This for me is the most critical area that needs to be improved before people will take Air seriously as a mobile framework. Simple things like view transitions, scrolling, button interactions, etc… have a noticeable sluggishness that users won’t stand for. Even the cream of the crop among Flex Hero apps, like Jonathan Campos’s nearly 100K user base NetFlix Queue Manager, is not immune to these problems. Though a majority of the comments are very complimentary, the few detractors have a very common message: we don’t want to install Adobe Air and we find it slower than native apps. Are these types of comments the whole story? Absolutely not. Does that mean they can be ignored? Absolutely not. The vocal complainers, though not always very helpful, can sometimes spur the necessary advances that can take a product to the next level.

    Summary

    Hey Adobe, fix the ugly, stay on top of the bad, and keep highlighting the good.

    While I am far from swearing off AS3 and Flex development for mobile devices, I think Adobe has a long way to go before it will be able to bring in a significant amount of non-Adobe developers. Their mobile platform and workflow seems as though it caters entirely to existing Flash and Flex developers. There just doesn’t seem to be an effort to bring in new blood from the outside. And if that remains the same, Appcelerator, PhoneGap, Sensa Touch, jQuery Mobile, or whatever other platform that comes next and engages larger cores of developers will take away valuable relevance in this land grab for mobile supremacy.

Repper: My first Flex Hero mobile app

Get Repper

→ Download Repper from its Android Market page
→ Full project source code available at
→ Follow the conversation on
→ Scan the QR code below to download from your mobile device
Repper on the Android Market
Repper

Overview

Repper is an Adobe Flex “Hero” based Android app that calculates your 1-10 rep max on any lift in the gym. For example, you might have a workout that requires you to know your 5 rep max on the bench press, but you you only know that you can lift 275 for 1 rep. Using Repper you can get a very close approximation based on estimation methods developed by fitness specialists. Just punch in 275 for the weight and 1 for your reps and Repper will return your 2-10 rep weight estimations.

The application itself isn’t that exciting, I know. The idea here was to see what the entire development and deployment cycle was like for Air for Android development. What’s easy with Flex/AS3/Air? What’s hard? What are the limitations? What are the annoyances? Where does it excel? Where is native development or even another mobile framework better suited? As it turns out, I generated a lot of answers to those questions. So many so as to merit their own blog post in the near future.

The other concept I was testing here was multi-screen development (inspired by Christian Cantrell’s work). If you peruse the source code you’ll notice that all layout and skinning was done with a liquid layout in mind. This means once I get the chance, Repper should be able to be deployed to other mobile devices like iPhone, iPads, Android tablets, or the Blackberry Playbook without much additional effort.

It was an interesting project and one from which I learned a great deal. in addition to the blog post on the ups and downs of Flex “Hero” that I alluded to earlier, I plan at least a handful of smaller instructional posts on some of the technique I picked up in this experiment. Topics will include handling portrait and landscape orientations with states, AS3 and MXML skinning, and liquid design for multiscreen projects. There’s more to share, but that seems more than enough to start.

All in all, this backend developer had a great time creating something visual and usable in the mobile environment. It won’t be long be another one of these app blog posts shows up!

Screenshots

Configure Flex SDK in Flash Builder 4

OK, this is a pretty boring update to the blog, but I thought it might be useful to at least a handful of people.  Flash Builder 4 comes with a stock version of the Flex 3.5 and 4.0 SDKs.  If you are like me, though, you want the latest and greatest as soon as you can get your hands on it.  For that reason I put together this very short and simple explanation of how to install specific Flex SDKs for your Flash Builder 4.  For those familiar with Flex Builder 3, this will seem pretty familiar.

- FLASH_BUILDER_4_HOME is your Flash Builder 4 install path (i.e., C:\Program Files\Adobe\Flash Builder 4)
- SDK_VERSION is the version number of your Flex SDK (i.e., 4.1.0)

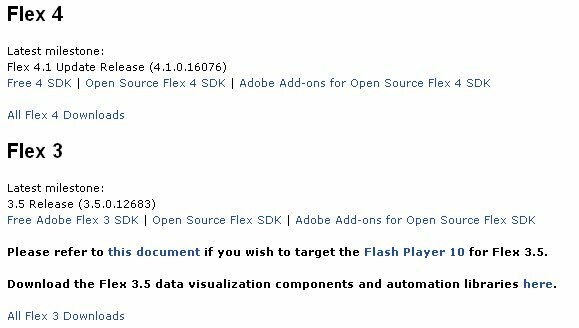
  1. Get your desired Flex SDK from the Flex SDK Download page.

    Flex SDK Download Page

  2. Unzip the archive to FLASH_BUILDER_4_HOME/sdks/SDK_VERSION
  3. Open Flash Builder 4 and in the menu bar goto Windows -> Preferences

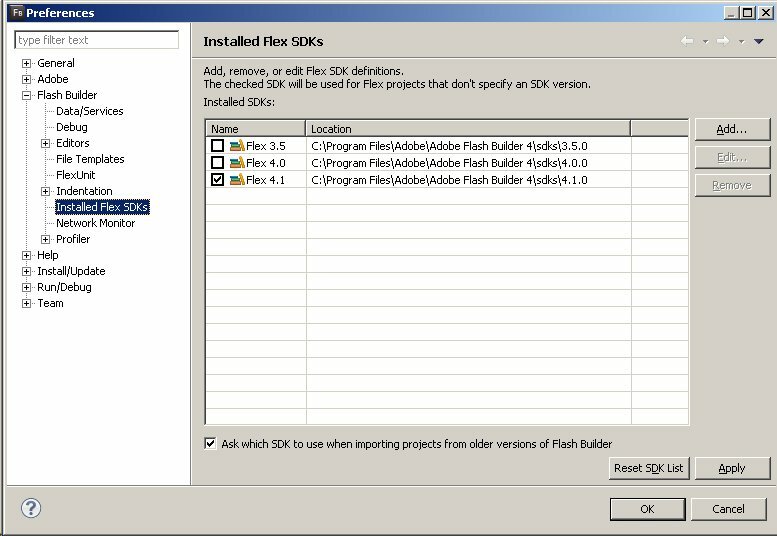
  4. In the left pane of the Preferences window expand “Flash Builder” and click “Installed Flex SDKs”.  Click “Add…” in the right pane.

  5. In the “Add Flex SDK” window enter the location of your new SDK (FLASH_BUILDER_4_HOME/sdks/SDK_VERSION) or click the “Browse..” button to find it yourself.  If you enter the path correctly, the “Flex SDK Name” field should auto-populate with the correct SDK name.

  6. Click “OK” and your Flex SDK should be successfully installed.  You can now also set it as the default, if you wish, for all your future Flex projects.  Just click the checkbox next to the name of your SDK and click “Apply”.

Even if you set up a new SDK as the default, there’s no reason you have to use it on all of your projects. During the creation of a new Flex project you can specify which SDK you want to use in the “Flex SDK version” section. You simply need to click the “Use a specific SDK” radio button and then select one of your installed SDKs from the drop down.

You can also change the SDK after the project is created. With your project selected, goto Project -> Properties and then click on “Flex Compiler” in the left pane. On the right you’ll now see the same “Flex SDK version” section that was mentioned in the last paragraph. Just change it and click “Apply”.

And thats about it. Dig and have fun, Flash Builder 4 really is a fantastic IDE.