From Air for Android to Blackberry Playbook in seconds

Overview

Repper for the Blackberry Playbook

NOTE: all source code is available for .

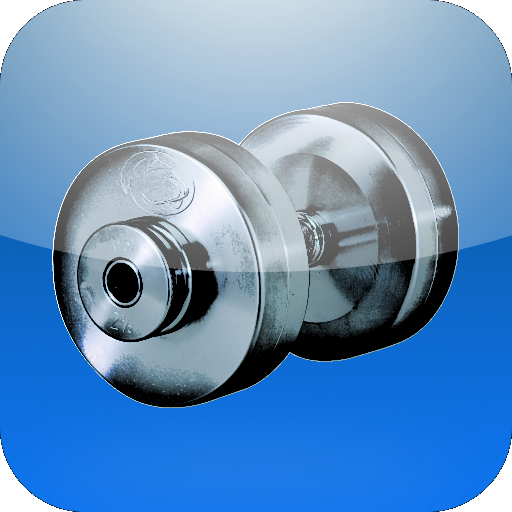
The above image shows my Air for Android app Repper ported over to the Blackberry Playbook.  The most remarkable thing about this port? It literally took about 60 seconds to complete!  Here is the shockingly simple, comprehensive list of steps I took to accomplish this:

  1. Create a new Flex mobile project in Flash Builder “Burrito” to target the Blackberry Playbook
  2. Copied the project files from my original Repper project to the new project
  3. Set up the Playbook simulator run settings in my new project
  4. Clicked “Run” and voila, Repper on the Playbook!

All components scaled properly.  All layouts fit to the available screen space appropriately.  All orientation transitions performed as expected.  How was this achieved without having to write a single line of device specific code?  It comes down to 3 simple things: Adobe Air, fluid layouts, and vector graphics skinning via Flex MXML.

Adobe Air

Blackberry’s use of the Adobe Air SDK for its Playbook development lets Flash/Air/Flex/AS3 developers leverage existing expertise and code to create apps.  The Air SDK for the Playbook also makes available QNX components to give Playbook apps a Blackberry look and feel.  You can choose from either.  This way Flex developers can use their existing paradigms and pure AS3 developers can make use of Blackberry’s QNX components.  You can even use both as Renaun Erickson details in this post.

For me the big win was taking Repper, a Flex “Hero” app for Android, and porting it directly, unchanged into a working Playbook app.  The Playbook Adobe Air SDK supports Flex “Hero” so everything just worked right out of the gate.  That’s the kind of portability that lets an independent developer be extremely productive.

Fluid Layout

Using fluid layouts with little to no defined pixel dimensions is key to writing a multi-screen app.  Take a look at this excerpt from the main .

        
id="landscapeGroup" includeIn="landscape" height="100%" width="100%"
paddingTop="{this.height*0.03}" paddingBottom="{this.height*0.03}" paddingLeft="{this.height*0.03}" paddingRight="{this.height*0.03}" gap="{this.height*0.03}" verticalAlign="middle"> id="landscapeInput" width="36%" skinClass="RepperInputSkin"> > paddingTop="{this.height*0.06}" paddingLeft="{this.height*0.06}" paddingRight="{this.height*0.06}" paddingBottom="{this.height*0.06}" gap="{landscapeInput.height*0.04}" horizontalAlign="right"/> >
width="100%" verticalAlign="middle" gap="0">
width="35%" text="{inputWeight}" keyUp="onWeightKeyUp(event)" restrict="0-9." contentBackgroundColor="0xffffff" color="0x000000"/> >
width="100%" verticalAlign="middle" gap="0">
width="35%" text="{inputReps}" keyUp="onRepsKeyUp(event)" restrict="0-9" contentBackgroundColor="0xffffff" color="0x000000" focusIn="textinput1_focusInHandler(event)"/> > > width="32%" height="100%" dataProvider="{repValues1}" itemRenderer="RepperEntry"/> width="32%" height="100%" dataProvider="{repValues2}" itemRenderer="RepperEntry"/> >

If you look at every component and container in this chunk of Flex MXML you’ll notice that no defined pixel dimensions are used. Every component’s size is determined using percentages or data bindings. I’m not going to lie, specifying dimensions in this manner will take more time and requires a bit of trial and error to get right. It helps if you do it with the expectation that another, dissimilar device will be using this same layout in the future. I did, and in this case the little bit of extra forethought paid off huge in terms of portability.

Because of design via fluid layouts, Repper appears properly in both portrait and landscape orientation on the Blackberry Playbook with no additional effort.

Vector Graphics via Flex MXML Skinning

The final factor that made Repper such a breeze to port to the Playbook was Flex Hero’s ability to create vector graphics via Flex MXML. By utilizing this capability you can create skins for your components that scale as the app scales. No external artwork of any kind is necessary. While this is not ideal for designers or highly stylized apps, a developer like me loves it.

Here’s another excerpt from Repper. This time it shows how I used fluid dimensions once again to create vector graphic skins for my components via the

     id="background" x="0" y="{this.height/6}" height="66%" width="100%" radiusX="10" radiusY="10">
        >
                 blurX="16" blurY="16"/>
        >
        >
                 weight="3"/>
        >
        >
                 rotation="-90">
                         color="#bbbbbb"/>
                         color="#ffffff"/>
                >
        >
    >
     x="0" y="{this.height/6}" height="66%" width="60%" radiusX="10" radiusY="10">
        >
                 blurX="8" blurY="8" angle="0"/>
        >
        >
                 weight="3"/>
        >
        >
                
                 rotation="-90">
                         color="#000000"/>
                         color="#444444"/>
                >
                
        >
    >

As you can see, percentages and binding are used to create skins for my components that are appropriately scaled regardless of the dimensions of the device. Not having to create skin resources for each device and orientation is a tremendous time saver. Especially for someone like myself who has no patience or talent for it.

Summary

Lesson for the day: with a little forethought and a penchant for Adobe Air, magic can happen. OK, maybe not magic, but you’ll have more time to explore the possibility of creating magic now that you won’t be wasting it on porting your mobile apps. Yes, I know, I’ve griped a bit lately about Flex Hero on , but there are undoubtedly some things it does very well.

In fact, if you think about it, anyone that openly supports Adobe and their efforts to create a viable cross-platform mobile development environment has done very well with it. I’m trying to think of who isn’t supporting it? Who’s at the “core” of the issue? I feel like day to day they are trying to keep the doctor away. Supporting Adobe should be as appealing as American pie. Oh well, hopefully some day they will have their thinking jolted like Isaac Newton did from a falling piece of fruit.

Titanium Developer Tips

Overview

First I want to start by pointing out that this Titanium Developer info will likely be moot in a short amount of time.  Titanium Appcelerator has recently acquired Aptana and is likely to release an IDE with deployment integrated, thus making Titanium Developer obsolete.  It should be tremendous for the workflow, but the beta isn’t due until March and there’s no certainty as to when it will be an official release.  So for the time being, let’s make due with Titanium Developer.

This isn’t a post on how to use Titanium Developer or develop apps with it.  For that information please reference Titanium’s own documentation:

Also remember that Titanium Developer is not an IDE, it is just a project and deployment platform.  For creating and editing content for your apps, you’ll need your own IDE.  I’d suggest one that specializes in HTML, CSS, and Javascript.  TextMate seems to be the weapon of choice for Mac based Appcelerator developers (among others) and there’s a bunch out there for other OSes, like Aptana, WebStorm, Notepad++, jEdit, and many more.  Obviously I’d suggest Aptana as that’s the new IDE of choice for Appcelerator.

OK, enough back story, here’s the things to consider when using Titanium Developer and some issues you may run into.  For reference, I was using Windows XP for Android development when most of this was uncovered.  I believe Appcelerator has a more natural focus on iOS workflow, so other Windows/Android developers will benefit most from this.   HUGE thanks goes out to Tony Guntharp and Chad Auld ( and respectively).  Without their help I probably would have quit Appcelerator before I got started.

Guide & Troubleshooting

  • First thing, be sure to follow the “Getting Started” guide completely.  Most issues that arise with Titanium Developer are a direct result of not doing one of the things specifically mentioned in this guide.
  • Make sure you installed the Java JDK (not just JRE) and that you add the JDK’s bin directory to your PATH environment variable.  If you don’t you are liable to run into some weird behavior in Titanium Developer including:
    • [ERROR] JDK version ‘javac’ is not recognized as an internal or external command
    • Your Run Emulator and Run on Device tabs may just appear as blank, grayed out panels
    • Other errors relating to compiling your application
  • Here’s some things you MUST have if you want the app to run on Android
    • Latest Titanium Mobile SDK (1.5.1 at the time of this post): you can download and install it through the status updates in the upper right corner of Titanium Developer
    • Kitchen Sink source code: Pull the source from Github for Kitchen Sink, don’t use the Downloads section.  The Kitchen Sink installed but would force close immediately after the splash screen finished on my Droid X when using the 1.5.0-update2 download.  You can use your favorite git client (like for me) or just download the source as a or .
    • Google APIs by Google Inc., Android API: You can download and install this using the Android SDK and AVD Manager that comes with your Android SDK installation.  It is available through Available Packages -> Third Party Add-ons -> Google Inc. add-ons

  • Android 1.5 is no longer supported and 1.6 is going to be end-of-lifed for Appcelerator soon.  They also have no yet dug into Android Honeycomb.
  • Titanium Developer projects can have problems deploying caused by artifacts of old builds, old Titanium SDK versions, or iOS/Android SDK changes.  Here’s a small list of brute force troubleshooting to try and get past these issues:
    • Uninstall apps before reinstalling: This isn’t often necessary, but it is a good first measure to take when getting deployment or execution issues with an Appcelerator app.  Think of it like your sys admin telling you to reboot before he digs into the real troubleshooting.
    • Restart Titanium Developer: see above
    • Try deleting and re-importing your project: This will ensure that all of your profile and project specific settings are being properly applied to your project.
    • Create a new project and copy your existing project’s content into it: Yeah, it ain’t pretty, but if the above doesn’t work this might help.  A fresh project will sometimes fix any corrupted project settings.
    • Delete the {PROJECT_PATH}/build/android and {PROJECT_PATH}/build/iphone folder: I’ve heard this advice but had no luck with it myself.  In fact I ran into even more errors when trying to emulate or run my project on a device.  Some, though, claim it will cause a full rebuild of your project in Titanium Developer and that it can often fix any build or deployment issues.  Try at your own risk.  I would make a backup of the directories you intend to delete.

Summary

While it may a bit of a bumpy road getting started, I have a feeling the investment in time will be worth it in the end.  If I was a patient person I would just wait until the new IDE beta came out and start working with he new, sanctioned workflow.  But I’m not a patient person.  Cross platform mobile development, with access to native components and near native performance, is just too cool to wait for.

I’m a Titanium Titan!

As of last night I have been accepted into the Titanium Titans program. To quote the description of the program itself:

Titanium Titans are experienced contributors to the Titanium Project who are responsible for representing, promoting, and expanding the Titanium Project and its ideals to the larger mobile community and the public at large.

I have to believe that my admission into the group was due in large part to Appcelerator coming out on top in my popular mobile framework comparison a few weeks ago. While that might be my only publicly visible lauding of Titanium Appcelerator, I assure you there is more behind the scenes. I am currently working on an internal app for my employer that will be securely delivering business critical data to various types of mobile devices via the Appcelerator framework.

I feel like big things are coming with Appcelerator. With the recent acquisition of Aptana and the launching of the Titans, its plain to see that they are making aggressive, yet calculated moves to be the #1 cross-platform mobile framework on the market. I am just glad that I will get to be a key part of it.

So I know a lot of my blog readers out there aren’t big HTML/CSS/JS fans, which is the core of Appcelerator development.  In fact, I know a lot of you hate it.  Seantheflexguy, I’m looking in your direction.  But I’m sure that many of you are curious.  I mean, come on, native components and near native performance without having to learn a native SDK… how can you turn a blind eye to that?  Dig in, give it a shot, and let me know what you think.  I’m sure the Titanium staffers would love to hear your perspective on their framework.  And I’ll make sure they hear it! ;)

The Good, The Bad, and The Ugly of Flex “Hero”

Disclaimer

This article is from the perspective of someone whose AS3 and Flex experience is measured in months. This is meant to show those who aren’t long time Flash developers what they can expect with Flex “Hero”, Flash Builder “Burrito”, and Air for Android. But I didn’t go in alone, the Adobe community is full of smart and helpful people, just check my to see some of the names that helped. Particular thanks to , , and .

Overview

Recently I wrapped up my first Flex “Hero” Air for Android app, Repper. You can read my earlier blog post about it to download, get source code, or just learn more about it. I learned a lot about mobile development and deployment, but I want to talk specifically about Flex “Hero” and Flash Builder “Burrito”. Here’s this developer’s experience and perspective with using Adobe’s workflow for mobile development.

The Good

  • The Flash Builder “Burrito” workflow for building Android apps is fantastic. It was a breeze to setup a basic project and be testing it live on my Droid X. Some of the specific things I really liked were:
    • Pre-built templates for projects, components, skins, item renderers, and more speed up the development process
    • Built-in emulation for various Android devices
    • Testing on a device is very easy to set up
    • Managing Flex states through the Design View can be helpful in visualing layouts
    • Offers the familiarity and plugins of Eclipse
  • ViewNavigator and View make navigating through applications using multiple views simple. Using simple functions like pushView() and popView() you can move through your application and pass data with ease. Check out these posts for a more in depth look at this powerful and intuitive interface:

    ViewNavigator

  • PersistenceManager alleviates the hassle of trying to manage data between view states by using Local Shared Objects. Even when your mobile OS decides to close your app for memory or power shortages, the PersistenceManager will preserve your designated data. Check Jonathan Campos’s post on it for more details: Flex 4.5 PersistenceManager
  • Flex 4 skinning is pretty damn nice, especially for someone like me who is about 95% developer, 5% designer. Using MXML and AS3 you can create design and graphics for your components, keeping them separate from your UI’s layout and logic. This means you can effectively create vector skins using the AS3 drawing classes. No more importing images just to create gradients and rounded corners. Not as big a win for designers, but the pure developers out there will love this. Check out Ryan Frishberg’s article for more details: Introducing skinning in Flex 4. The screenshot showing Repper below highlights entirely programmatic design.
  • Repper with Flex 4 Skinning

  • Multiscreen development potential is very appealing and Adobe is working to grow it further. Christian Cantrell’s demo video below shows what Adobe Air is capable of in terms of “code once, deploy everywhere.” Android, iPhone, iPad, Blackberry Playbook, Desktop, and web are all valid targets for your single code base. While this is very exciting, it is also very young. Take this all with a grain of mobile salt as this topic shows up again in the “Ugly” section.
  • The Bad

    • Lack of native component support can be a deal breaker for some people building mobile apps. Its not for me nor for lots of people who are comfortable building their own components, but many want the native experience. But all hope is not lost with the following AS3 libraries available that emulate native components:

    • Nick Jonas

      Kevin Hoytandroid-components
    • Flex “Hero” is missing some core components that mobile developers will be expecting to be present. I for one was not expecting to have to build a modal select list from scratch. Unfortunately, though, Flex “Hero” does not contain the mobile equivalent of a combobox. You can create it with their scrollable List component paired with a semi-transparent background, but it would be nice to have this out of the box. Other notable absentees are sliders and tabbed layouts.
    • Not all native APIs are supported. While this should be expected in a cross platform framework, it can sometimes lead to unexpected roadblocks. In my case, I have only numeric input in my app. I wanted to default the soft keyboard to the numeric keyset. Unfortunately this is not possible in Air for Android. It takes some AS3 parlor tricks just to keep the soft keyboard closed when you don’t want it open on a TextInput focus. There’s even more to worry about with Apple development, but I’ll mention that in the “Ugly” section.
    • Simple things can be complicated. Take for example closing an app when a user leaves with the back button. Seems easy enough, but it takes 3 event handlers to do it properly and even this method is not without its problems. Check out the code I used below, thanks to Tom Krcha:
      protected function mobileapplication1_creationCompleteHandler(event:FlexEvent):void
      {
              if(Capabilities.cpuArchitecture=="ARM")
              {
                      NativeApplication.nativeApplication.addEventListener(Event.ACTIVATE, handleActivate, false, 0, true);
                      NativeApplication.nativeApplication.addEventListener(Event.DEACTIVATE, handleDeactivate, false, 0, true);
                      NativeApplication.nativeApplication.addEventListener(KeyboardEvent.KEY_DOWN, handleKeys, false, 0, true);
              }
      }
       
      private function handleActivate(event:Event):void
      {
              NativeApplication.nativeApplication.systemIdleMode = SystemIdleMode.KEEP_AWAKE;
      }
       
      private function handleDeactivate(event:Event):void
      {
              NativeApplication.nativeApplication.exit();
      }
       
      private function handleKeys(event:KeyboardEvent):void
      {
              if(event.keyCode == Keyboard.BACK)
                      NativeApplication.nativeApplication.exit();
      }
    • Debugging on a device can be tricky. So tricky in fact that I never got it working. In all fairness, I didn’t try to diagnose it any further after the getting the initial error because the app I was building was so simple. But the fact remains that it didn’t work out of the box for me. Maybe your experience will be different and I welcome anyone to call me an idiot and tell me what I did wrong.

    The Ugly

    • Universal mobile device support is minimal at this point. Android is covered pretty well up through the Air 2.5 SDK, but iPhone/iPad only support Air up to version 2.0.2 via the Adobe Packager for iPhone. This leaves out key APIs like camera support and video/sound capture, not to mention the bevy of bugs and gotchas that you have to watch out for. The workflow for deploying apps to iOS devices with the packager is also no picnic. While the Blackberry Playbook is proudly supporting the Adobe developer community, there’s been no official announcement, though there has been mention, of Flash or Air being on Blackberry smart phones.

      Long and short, you aren’t going to be hitting the widest part of the market when compared to other mobile frameworks like Appcelerator or PhoneGap. And even if you do, I’ve experienced first hand how users can be put off by having to install Adobe Air on their phone for the sake of an app. Until Air for mobile devices support becomes more common place, it may be viewed as an unnecessary evil by many mobile users.

    • Performance can be a problem for even the simplest apps. This for me is the most critical area that needs to be improved before people will take Air seriously as a mobile framework. Simple things like view transitions, scrolling, button interactions, etc… have a noticeable sluggishness that users won’t stand for. Even the cream of the crop among Flex Hero apps, like Jonathan Campos’s nearly 100K user base NetFlix Queue Manager, is not immune to these problems. Though a majority of the comments are very complimentary, the few detractors have a very common message: we don’t want to install Adobe Air and we find it slower than native apps. Are these types of comments the whole story? Absolutely not. Does that mean they can be ignored? Absolutely not. The vocal complainers, though not always very helpful, can sometimes spur the necessary advances that can take a product to the next level.

    Summary

    Hey Adobe, fix the ugly, stay on top of the bad, and keep highlighting the good.

    While I am far from swearing off AS3 and Flex development for mobile devices, I think Adobe has a long way to go before it will be able to bring in a significant amount of non-Adobe developers. Their mobile platform and workflow seems as though it caters entirely to existing Flash and Flex developers. There just doesn’t seem to be an effort to bring in new blood from the outside. And if that remains the same, Appcelerator, PhoneGap, Sensa Touch, jQuery Mobile, or whatever other platform that comes next and engages larger cores of developers will take away valuable relevance in this land grab for mobile supremacy.

Repper: My first Flex Hero mobile app

Get Repper

→ Download Repper from its Android Market page
→ Full project source code available at
→ Follow the conversation on
→ Scan the QR code below to download from your mobile device
Repper on the Android Market
Repper

Overview

Repper is an Adobe Flex “Hero” based Android app that calculates your 1-10 rep max on any lift in the gym. For example, you might have a workout that requires you to know your 5 rep max on the bench press, but you you only know that you can lift 275 for 1 rep. Using Repper you can get a very close approximation based on estimation methods developed by fitness specialists. Just punch in 275 for the weight and 1 for your reps and Repper will return your 2-10 rep weight estimations.

The application itself isn’t that exciting, I know. The idea here was to see what the entire development and deployment cycle was like for Air for Android development. What’s easy with Flex/AS3/Air? What’s hard? What are the limitations? What are the annoyances? Where does it excel? Where is native development or even another mobile framework better suited? As it turns out, I generated a lot of answers to those questions. So many so as to merit their own blog post in the near future.

The other concept I was testing here was multi-screen development (inspired by Christian Cantrell’s work). If you peruse the source code you’ll notice that all layout and skinning was done with a liquid layout in mind. This means once I get the chance, Repper should be able to be deployed to other mobile devices like iPhone, iPads, Android tablets, or the Blackberry Playbook without much additional effort.

It was an interesting project and one from which I learned a great deal. in addition to the blog post on the ups and downs of Flex “Hero” that I alluded to earlier, I plan at least a handful of smaller instructional posts on some of the technique I picked up in this experiment. Topics will include handling portrait and landscape orientations with states, AS3 and MXML skinning, and liquid design for multiscreen projects. There’s more to share, but that seems more than enough to start.

All in all, this backend developer had a great time creating something visual and usable in the mobile environment. It won’t be long be another one of these app blog posts shows up!

Screenshots

RockBox: Make your old MP3 player cooler than it ever was

Rockbox is an open source firmware for mp3 players, written from scratch. What does that mean? It means you can take your old mp3 player (like my 1st gen iPod mini for example), install Rockbox, and make it cooler than it ever was in the first place. How cool? Cool like playing “Doom” on my 1st generation iPod Mini, that’s how cool.

First gen iPod Mini running Doom

A closer Look

Contrasted so its easier to see

Aside from the slightly impractical Doom gaming there’s some pretty neat stuff you can also do with Rockbox installed. Here’s just a peek at some of the stuff you can make your old device do with Rockbox:

  • Re-skin your player’s interface with downloadable themes
  • Run applications like alarms clocks, text editors, or battery benchmarking
  • Play games like Doom, sudoku, and solitaire
  • Edit playlists directly from your player
  • Access and view files on your player

Rockbox main menu

Rockbox plugins menu

So what do you have to do to achieve this level of coolness? You pretty much just have to connect your mp3 player to your computer and download the Rockbox installer and follow the instructions. Once downloaded, just extract the Rockbox Utility program and run it. It should then guide you through the steps necessary to get up and running.

Autodetect is your friend when configuring. Chances are if autodetect doesn’t work for you, you either don’t have a compatible device (supported devices) or your computer doesn’t recognize it. If you do encounter any issues, Rockbox has a user’s forum where you can search for troubleshooting info or ask questions of your own. Aside from that, I have a few tips here in case you run into any of the same problems I did.

Troubleshooting

  • Make sure that your computer recognizes your device as connected before attempting to install Rockbox. Try unplugging and replugging in your device to get it to show up.
  • If you get proxy or network errors it means Rockbox can’t download the necessary files to complete you installation. Stop goofing around at work and try it when you get home. ;)
  • If you get a popup that says “Your configuration is invalid” chances are that your device mapped to a new drive or that you don’t have it plugged in.
  • During the Rockbox installation onto your player, you might get an error that says “Failed to add bootloader”. Make sure you have selected the right device and version for the Rockbox install.
  • If all else fails, do a factory reset of your player and try the install again.

Have fun Rockboxing! Be sure to if you find it valuable.

Hello, Blackberry Playbook!

BlackBerry Playbook

Time to say “Hello, World!” to the newest kid on the tablet device block, the BlackBerry Playbook.  Why bother developing for a tablet that isn’t even publicly available yet?  Because Research in Motion (RIM) is offering free Playbooks to developers who create “useful” applications for it.  Thats right, if you join the RIM vendor list (free registration for a limited time only) and submit a quality app, you will receive a free Playbook.  Great incentive to bring developers to your platform.

So how do you get started? Go to the Playbook developers site and follow the instructions there.  Be warned, though, that its not the simplest setup.  Right now RIM has workflows for developing Playbook apps in Blackberry WebWorks and Adobe Air (via Flash Builder 4.0.1 or “Burrito“).  For my first go around I chose the Flash Builder 4.0.1 workflow.

Wanna take a quick peek at the code involved with the Hello World (seen above) for this workflow?

AIRHelloWorld.as

package 
{
        import flash.display.Sprite;
        import flash.events.MouseEvent;
        import flash.text.TextField;
        import flash.text.TextFormat;
        import qnx.ui.buttons.Button;
        import qnx.ui.buttons.LabelButton;
 
        // The following metadata specifies the size and properties of the canvas that
        // this application should occupy on the BlackBerry PlayBook screen.
        [SWF(width="1024", height="600", backgroundColor="#cccccc", frameRate="30")]
        public class AIRHelloWorld extends Sprite
        {
                public function AIRHelloWorld()
                {
                        var helloButton:LabelButton = new LabelButton();
                        helloButton.label = "Hello World!";
                        helloButton.x = (stage.stageWidth - helloButton.width)/2;
                        helloButton.y = (stage.stageHeight - helloButton.height)/2;
 
                        var myFormat:TextFormat = new TextFormat();
                        myFormat.color = 0xAA0000;   
                        myFormat.size = 24;  
                        myFormat.italic = true;  
                        myFormat.align = "center";
 
                        var text:TextField = new TextField();
                        text.text = "Close";
                        text.setTextFormat(myFormat);
 
                        var closeButton:Button = new Button();
                        closeButton.addChild(text);         
                        closeButton.addEventListener(MouseEvent.CLICK, closeWindow);
                        closeButton.x = (stage.stageWidth - closeButton.width)/2;
                        closeButton.y = helloButton.y - helloButton.height;
 
                        addChild(helloButton);
                        addChild(closeButton);
 
                        stage.nativeWindow.visible = true;
                }
 
                private function closeWindow(event:MouseEvent):void{
                        stage.nativeWindow.close();
                }
        }
}

All of you AS3 and Flash developers should be pretty pleased. You get the comforts of your language of choice with the ability to access native QNX components; the best of both worlds.

Setup Pitfalls

I can’t stress enough that you need to follow the instructions exactly or you won’t get it working.  I speak from experience.  Perhaps you can save yourself a few minutes (or hours) of searching for the resolution to the cryptic errors you may encounter by looking at the problems I ran into.  But really, all of these could be avoided by following the instructions exactly as written.

The Flash Builder 4.0.1 update must be installed

They only mention 4.0.1 about a dozen times but I figured “how important can a point release be?”.  Turns out, very.  You’ll see this if you ignore it too:

An internal error occurred during: "Launching AIRHelloWorld".
com.adobe.flexide.launching.air.ApolloLaunchConfiguration.getAIRProfile()Ljava/lang/String;

Just download and install the Flash Builder 4.0.1 update and all will be resolved.

Adobe Air 2.5 must be installed

Again, they are clear as day about this, but you need to install the Adobe Air 2.5 SDK. The version that comes with Flash Builder 4 is only 2.0.2, or might be 1.5, I can’t remember off hand. You can find the version of Air your BlackBerry Tablet SDK is installed against by looking at the app config XML file (AIRHelloWorld-app.xml) in your project. The first node, application, indicates the Air version used:

 xmlns="http://ns.adobe.com/air/application/2.5">

In any case, if its not the right version you have to install Air 2.5 or you’ll see an error similar to this:

Error: Cannot find node: versionNumber

This is because the versionNumber node in your app configuration isn’t supported before Air 2.5. In order to fix this error, you need to reinstall the BlackBerry Tablet SDK and make sure to point it at the directory of Adobe Air 2.5 during the install. If someone knows a better way to do it without having to reinstall the Blackberry Tablet SDK I’m all ears.

Put your Playbook Simulator in Development Mode

Even if you remember to put your Playbook Simulator in Development Mode as per the instructions, you’ll probably forget (like me) that you need to do that whenever you restart the simulator. I’m not aware of a way to set Development Mode ON by default. Here’s the error you’ll see:

Using icon: C:\development\AIRHelloWorld\bin-debug\blackberry-tablet-icon.png
Package created: C:\development\AIRHelloWorld/AIRHelloWorld.bar
Sending Install and Launch request...
Error: Device is not in the development mode. Switch to Development from Security settings on the device.

All you have to do is follow the instructions here, which will tell you to do the following:

  1. Activate the Playbook Simulator
  2. Click the gear icon at the top right
  3. Click “Security”
  4. Click “General” under “Security Settings”
  5. Toggle “Development Mode” to ON under “Development Settings”

Summary

That’s all I got so far. It looks like a terrific platform and is really engaging a lot of the development community by integrating native access through external SDKs. Soon as my plate clears up a bit I’m gonna hit this full steam and add myself to the list of the lucky talented developers (like Jason Fincanon) getting themselves a free Playbook.

Review: Appcelerator vs. PhoneGap vs. Adobe Air

Overview

UPDATE: This was originally posted January 18th, 2011. All 3 platforms have changed immensely since.

UPDATE: If have updated and more detailed information about Appcelerator and PhoneGap at this link: https://savagelook.com/blog/portfolio/a-deeper-look-at-appcelerator-and-phonegap

I have been charged with deciding on a mobile framework for deploying a single code base to multiple devices (iPhone, iPad, Android, Blackberry). Naturally, I was gravitating towards Adobe Air since most of my personal work these days has been in AS3. I wanted to see what else was out there, though, and was pretty surprised that Adobe Air wasn’t my choice in the end.

In addition to one other commercial platform I did not fully assess (too expensive), I looked at Adobe Air for mobile, Titanium Appcelerator and PhoneGap. All are free to use frameworks for centralized mobile development. The gist is to be able to create apps for multiple devices off the same code base. With iPad & Blackberry support, speed to market, and the ability to use Contacts & Multitouch as my critical points, I began digging.

General Functionality

Titanium Appcelerator PhoneGap Adobe Air for Mobile Notes
Android Support Adobe Air requires Android 2.2+
iPhone/iPad Adobe Air creates iOS apps with the Packager for iPhone
Blackberry Phone Appcelerator support is currently beta.
Blackberry Playbook Appcelerator support is currently beta.
Symbian
Palm
Windows Phone 7 is a 3rd party attempt for PhoneGap.
Native UI support PhoneGap and Adobe Air both require 3rd party libraries. PhoneGap has UIControls for PhoneGap. Adobe Air has and android-components
Native code support Appcelerator allows module development. PhoneGap uses .
Desktop deployment PhoneGap has 3rd party libraries on Github: &
Deploy without Mac? Adobe Air uses the Packager for iPhone/iPad
IDE & Tools Titanium Developer PhoneGap Tools Flash Builder, FDT, FlashDevelop Appcelerator has no current IDE, but recently acquired Aptana
Interpreting Javascript mapped to native code Rendered in web view control Adobe Air runtime
Community Resources Developer Center Docs, Wiki, , and Mobile and Devices Development Center
Languages used JS HTML, JS, CSS Actionscript3 Appcelerator also uses PHP, Ruby, and Python for desktop app development
Support $2,189 per year per developer ranges from $1,000 – $25,000 per year Adobe Support Adobe offers no professional mobile support for apps, just their products.

Device APIs

Beyond the overall support structure of the frameworks I wanted to get into the specific device API functionality. This was a little harder to track down, but the list here should be accurate as of the writing of this post. As I said earlier, contacts and multitouch were the only criticals, but I wanted to know what else these frameworks offered. I’m assuming anyone reading this far would find this information valuable as well.

Titanium Appcelerator PhoneGap Adobe Air for Mobile Notes
Accelerometer
Geolocation
Vibration
Camera Not yet supported Adobe Air for iPhone/iPad
Contacts
Multitouch
SQLite
File System IO
SMS All support SMS via the “sms:” URL prefix.
Phone API
Copy/Paste
Sounds PhoneGap cannot record sounds. Adobe Air cannot record sound for iPhone/iPad
Bluetooth
Video Capture Adobe Air cannot record video for iPhone/iPad.

Summary

That’s what I’ve got so far. Let me know if and when some of these assessments change. I’m also eager to hear other people’s thoughts. Feel free to chime in.

The long and short of my recommendations:

  • Go Adobe Air if performance isn’t critical and you have AS3 experience. The tools and workflow for using pure AS3 or Flex Hero make turning out mobile apps very smooth. Watch out for performance, particularly on iOS.
  • Go PhoneGap if you needed the widest range of support for devices. If you need it to run everywhere, this is your framework. Beware of the less than stellar documentation and wiki, though.
  • Go Appcelerator everything else. The native UI and ability to access native code is a big win. Also, the community, IDE, and documentation are top notch. Appcelerator was my choice in the end, but that doesn’t mean its right for you.

8 Steps for being an Asshole Effectively

Exhibit A

I needed information on PHP debugging in IntelliJ. After nearly tearing my hair out trying to get it to work using online references, I pleaded to the twitter community for help. It went something like this

: Anybody know how to get #PHP debugging working in #IntelliJ?
* crickets *
: I have everything else working, I just can’t get #PHP debugging in #IntelliJ. Any help?
*crickets *

Absolutely nothing. It was just another drop of water in a sea of questions that never get answered on Twitter. But I’ve found a way to get around this. Be an asshole. That’s right, vent your frustration, call out the project or software you are working on, swear it off for life. This method becomes even more effective as your number of followers grows. Again, I paraphrase:

: Screw #IntelliJ, #PHP debugging won’t work right so I’m off to try Aptana and Eclipse.

Within minutes I had half a dozen responses back, including one who spent 20 minutes helping me troubleshoot the process (thanks ). This is not the first time this has happened. I asked basic questions about the PhoneGap mobile development framework on Twitter to get only one generic response. I “rephrased” in a less complimentary manner and within minutes had 2 of their project members messaging me.

Why does it work like this? The power of negative press in social media is too powerful to ignore. These projects know that positive word of mouth and community support is their life blood. Jeopardize that and watch people flock to your aid.

How To

Here’s the checklist for being an effective asshole in social media to get information you need.

  1. The bigger your audience (AKA, followers and friends), the more likely your negative comments will be worth extinguishing.
  2. # and @ on Twitter go a long way. Target the people you have a beef with and give them a chance to retort.
  3. Be specific with your negativity. “IntelliJ sucks” would have gotten me nowhere. Direct complaints about functionality are the way to go.
  4. Don’t be stupid. A sure fire way to get ignored is screaming “BUG” when you should RTFM.
  5. Be nice once someone does help. If they have the patience to deal with your sarcasm, they deserve your respect.
  6. Be grateful. If you do have some social media clout, be sure to praise the project after and thank the person that helped.
  7. Don’t be afraid to have more than one conversation about your frustration with a product, but don’t flood your stream with whining.
  8. Use sparingly. Don’t be the boy who cried wolf.

And that’s pretty much all it takes. Now remember, the idea is to bring intelligent people into a problematic situation you are having, not to be a cantankerous prick. Play the game, but be sure to shake hands afterwards, regardless of who “wins”.

PHP Debugging on IntelliJ IDEA 10 with XDebug

The Overview

So after being told by my peers that print_r() was adequate, I embarked on a quest to get true PHP debugging working in a reputable IDE. Recently I’ve heard nothing but good things about IntelliJ IDEA 10, so I decided that would be my test subject. Don’t let the “J” fool you, while Java is its focus, this bad boy handles an array of languages and markups, including ActionScript, PHP, Groovy, Scala, Python/Jython, Ruby/JRuby, Clojure, Javascript, and HTML.

If you are a serious PHP developer and have not given debugging a fair chance, or a chance at all, you are killing yourself. So let’s do this thing from the ground up. WAMP, XDebug, IntelliJ, and magic. Follow these steps (for Windows) to reach my recent state of elightenment and PHP debugging bliss.

By the way, I almost gave up on IntelliJ entirely due to problems with debugging until Alex Petrescu () talked me down from the edge. I’m very grateful as IntelliJ is proving to be an excellent IDE.

Step By Step

  1. Download and install WAMP (I installed to C:\wamp)
  2. After installing WAMP, create a file named C:\wamp\www\info.php that contains the following code:
     phpinfo(); ?>
  3. Open the http://localhost/info.php in a browser to get your PHP configuration.
  4. Now view the source of the page in your browser. Copy the entire contents of the source to your clipboard.
  5. Goto the XDebug Tailored Installation Instructions and paste your PHP configuration source into the text box then click “analyse my phpinfo() output”.
  6. Follow the resulting instructions for adding XDebug to your PHP installation. Once you make those changes, make sure the new section of your php.ini looks like this (as per a C:\wamp installation):
    [XDebug]
    zend_extension=""
    xdebug.remote_enable=true
    xdebug.remote_port=9000
    xdebug.profiler_enable=1
    xdebug.profiler_output_dir="c:\wamp\logs"
  7. Download and install IntelliJ IDEA 10 Ultimate Edition (trial). It may not be necessary, but I included all the available extensions.
  8. Setup a basic PHP project in IntelliJ IDEA 10
    1. Goto File -> New Project…
    2. Select Create project from scratch and click Next
    3. Enter a name for your project and select Project Module under the Select Type heading and click Next
    4. Select “do not create source directory” and click Next
    5. Click Finish then OK when asked about starting a project without a JDK assigned.
  9. Create a PHP file to test debugging
    1. In the project panel on the left side, right click the project name and goto New -> PHP File
    2. Enter a name for your PHP file and click OK
    3. In the code panel on the right, enter the following and save the file:
      
      $a = 0;
      ?>
  10. Click the vertical bar between the project panel and the code panel next to the following line to create a red breakpoint:
    $a = 0;
  11. Copy the PHP file you created in step #9 to your WAMP www directory (C:\wamp\www)
  12. Right click on the PHP file name in the project panel, then goto Debug -> filename.php on server
  13. In the resulting window, click the dotted button next to the Server dropdown
  14. Setup your deployment settings
    1. Select Local from the access type dropdown
    2. Click the Mappings tab and under “web path on server” enter a single slash “/” to specify the WAMP root. Click OK and then OK again to finish the configuration.
  15. Right click on your PHP file in the project panel again and goto “Run on server” or “Debug on server“. I’ve had inconsistent behavior using it, so try both if one doesn’t work.
  16. If all went according to plan, a browser should open and execution should stop at your breakpoint. If you look at your debug panel on the bottom on IntelliJ you should now see your PHP globals laid out. Congrats, you made it!


The Summary

I know, its not exactly a walk in the park, but its well worth the work to not have to pollute your code with copious print_r() calls. You can now have full access over your PHP as you would with any other enterprise level language and debugger. I didn’t go into any specific detail here, but I plan in the future to discuss all the ins and outs of PHP debugging in IntelliJ IDEA 10. Its looks to be a great IDE thus far.

If you have any questions, which is likely since I ran into some inconsistent behavior, feel free to comment and I’ll try to answer back as quickly as possible. Hopefully you’ll never even need to ask.

Happy PHP debugging!